�\Մandroid�е��m����ģʽ
�r�g��2018-09-26 ��Դ��δ֪
�\Մandroid�е��m����ģʽ
�r�g��2018-09-26 ��Դ��δ֪
���ԣ����L�ڵ�android�̌W�У����y�l�FListView��һ���W��ʮ���^ʹ�ĽM����ԭ��ܺ��Σ��@���Ђ��m�����ĸ�����ڌW�����v��һ����δ�漰���µ��I����ô�҂���ͨ�^�@߅�������Rһ��ܛ���OӋģʽ�е��m����ģʽ��
1.�m����ģʽ�Ķ��x��
Convert the interface of a class into another interface clients expect. Adapter lets classes work together that couldn't otherwise because of incompatile interfaces.
��һ��Ľӿ�׃�ɿ͑������ڴ�����һ�нӿڣ��Ķ�ʹԭ����ӿڲ�ƥ����o����һ�����ăɂ���܉���һ������
�����õ��m����ģʽ�Ľ������Ӿ��Dz���ƥ�䆖�}��ֱ�ӽo�D��
2.�m����ģʽ�ķ��
�m����ģʽ��Ҫ�֞�ɷN����m�����͌����m����
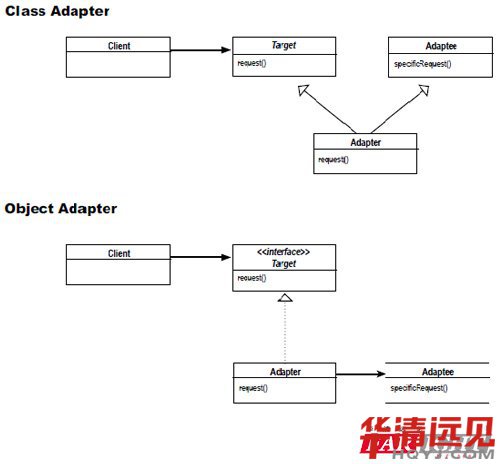
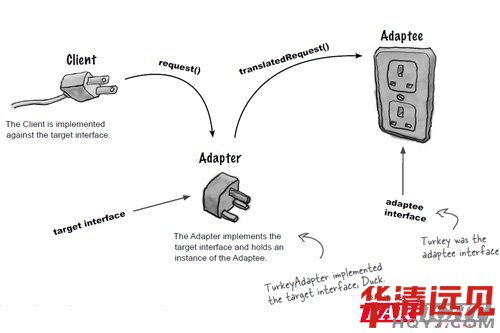
���ψD��ʾ(��ȡ�ԡ�Head First Design Patterns��һ��)����Ҫ�����������֣�
1) TargetĿ�˽�ɫ��ԓ��ɫ���x��������D�Q���҂����ڴ��ӿڡ�
2) AdapteeԴ��ɫ������ԭʼ��ͽӿڌ��������ѽ����ڵģ�ֻ�Dz����ϬF�е�Ҫ����Ҫ�����m������ɫ�İ��b��
3) Adapter�m������ɫ���m����ģʽ�ĺ��Ľ�ɫ�������ɂ���ɫ�����ѽ����ڵĽ�ɫ�����m������ɫ����Ҫ�½����ģ�����؟�dz�����;��Դ��ɫ�D�Q��Ŀ�˽�ɫ;ͨ�^�^�л��ǽM�ϵķ�ʽ��
3.�m����ģʽ�ă��ݣ�
1)�m����ģʽ�����ɂ��]���κ��Pϵ�����һ���\�У�ֻҪ�m�����@����ɫ�܉�㶨������
2)�������ͨ�ԣ��҂��L����TargetĿ�˽�ɫ�����Ǿ��w�Č��F��ί�нo��Դ��ɫ�����@Щ���ߌӴ�ģ�K�����ģ�Ҳ��������Ҫ�P�ĵá�
3)�{����ď����Ժ��`���Էdz��á�����X���m��������ã�ֻҪ���m�������У������Ĵ��a�������ģ��m��������һ���`��Ę��������þ��á�
4.�m����ģʽ��androidԴ�a�еđ��ã�
��AndroidԴ�a�У�ListView���õ��ľ����m����ģʽ��ListView�����@ʾ�б픵�������б픵����ʽ��N����()������̎�����@ʾ��ͬ�Ĕ������҂���Ҫ�������m�������������
��ListView����һ��׃��ListAdapter mAdapter;���@ʾ��viewԇ�D�ϵĔ�����
/**
* The adapter containing the data to be displayed by this view
*/
ListAdapter mAdapter;
��ListAdapter�ж��x������Ҫ�Ľӿں�����
package android.widget;
/**
* Extended {@link Adapter} that is the bridge between a {@link ListView}
* and the data that backs the list. Frequently that data comes from a Cursor,
* but that is not
* required. The ListView can display any data provided that it is wrapped in a
* ListAdapter.
*/public interface ListAdapter extends Adapter {
/**
* Indicates whether all the items in this adapter are enabled. If the
* value returned by this method changes over time, there is no guarantee
* it will take effect. If true, it means all items are selectable and
* clickable (there is no separator.)
*
* @return True if all items are enabled, false otherwise.
*
* @see #isEnabled(int)
*/
public boolean areAllItemsEnabled();
/**
* Returns true if the item at the specified position is not a separator.
* (A separator is a non-selectable, non-clickable item).
*
* The result is unspecified if position is invalid. An {@link ArrayIndexOutOfBoundsException}
* should be thrown in that case for fast failure.
*
* @param position Index of the item
*
* @return True if the item is not a separator
*
* @see #areAllItemsEnabled()
*/
boolean isEnabled(int position);
}
�����^����Adapter��
����Adapter���x��getCount()��getItemViewType(int position)�Ƚӿں�����
�˕r��ListAdapter����һ��TargetĿ�˽�ɫ�����҂���ListView����һ��Client����˞����m����@ʾһЩ��������Cursor�ȣ����Ծ���Ҫ�������m����CursorAdapter�����a���£�
public abstract class CursorAdapter extends BaseAdapter implements Filterable,
CursorFilter.CursorFilterClient {������
protected Cursor mCursor;
protected ChangeObserver mChangeObserver;
protected DataSetObserver mDataSetObserver;
protected CursorFilter mCursorFilter;
������
/**
* Returns the cursor.
* @return the cursor.
*/
public Cursor getCursor() {
return mCursor;
}
// ���FListAdapterĿ�˽ӿڵ�getCount������ͨ�^����Դ��ɫmCursor�ķ���getCount����
/**
* @see android.widget.ListAdapter#getCount()
*/
public int getCount() {
if (mDataValid && mCursor != null) {
return mCursor.getCount();
} else {
return 0;
}
}
// ���FListAdapterĿ�˽ӿڵ�getItem������ͨ�^����Դ��ɫmCursor�ķ���moveToPosition����
/**
* @see android.widget.ListAdapter#getItem(int)
*/
public Object getItem(int position) {
if (mDataValid && mCursor != null) {
mCursor.moveToPosition(position);
return mCursor;
} else {
return null;
}
}
// ���FListAdapterĿ�˽ӿڵ�getItemId������ͨ�^����Դ��ɫmCursor�ķ���getLong����
/**
* @see android.widget.ListAdapter#getItemId(int)
*/
public long getItemId(int position) {
if (mDataValid && mCursor != null) {
if (mCursor.moveToPosition(position)) {
return mCursor.getLong(mRowIDColumn);
} else {
return 0;
}
} else {
return 0;
}
}
@Override
public boolean hasStableIds() {
return true;
}
����Դ��ɫCursor�ӿ�������ʾ��
public interface Cursor {
������
/**
* Returns the numbers of rows in the cursor.
*
* @return the number of rows in the cursor.
*/
int getCount();
/**
* Returns the current position of the cursor in the row set.
* The value is zero-based. When the row set is first returned the cursor
* will be at positon -1, which is before the first row. After the
* last row is returned another call to next() will leave the cursor past
* the last entry, at a position of count().
*
* @return the current cursor position.
*/
int getPosition();
������
/**
* Move the cursor to an absolute position. The valid
* range of values is -1 <= position <= count.
*
*
This method will return true if the request destination was reachable,
* otherwise, it returns false.
*
* @param position the zero-based position to move to.
* @return whether the requested move fully succeeded.
*/
boolean moveToPosition(int position);
������
/**
* Returns the value of the requested column as a long.
*
*
The result and whether this method throws an exception when the
* column value is null, the column type is not an integral type, or the
* integer value is outside the range [Long.MIN_VALUE,
* Long.MAX_VALUE] is implementation-defined.
*
* @param columnIndex the zero-based index of the target column.
* @return the value of that column as a long.
*/
long getLong(int columnIndex);
������
}
�@�͌�Cursor��ͽӿ�ͨ�^CursorAdapter�m�����D�Q��Ŀ�˽�ɫListAdapterĿ�˽ӿڣ��^��ListViewʹ�ã���չʾ��
���Ͼ���android���P��ListView���m����ģʽʹ��һЩ���η�����ϣ������ҌW��ListView����������